This article was written by Pablo Toledo, Rush Soccer’s Sporting Project Director.
After years coaching senior age groups, this year I decided to go back to coaching grassroots, so I took a U9 and a U11, both teams formed by players just coming out of our recreational program.
Alongside this new venture, I decided to start taking notes of the process. As a real study case, I’d like to share them with you, including the mistakes I’ve already made and the ones I’ll make along the season, but also hoping it will be a good source of ideas and it will also give an example of how to use and make the most out of the endless resources that Rush Soccer Development provides you with, so here we go:
As I said, my two teams are U9 and U11, and for both this is their first experience playing competitive soccer, so the first part (in my opinion of any process) was to assess or to diagnose (what they can do, and what they can’t do).
How did I do that assessment? Easy, just taking Rush Soccer Development’s Curriculum Topic Charts. Simple as that, look at the chart and check if they seem to be proficient at the items listed.
Example (for attacking topics):
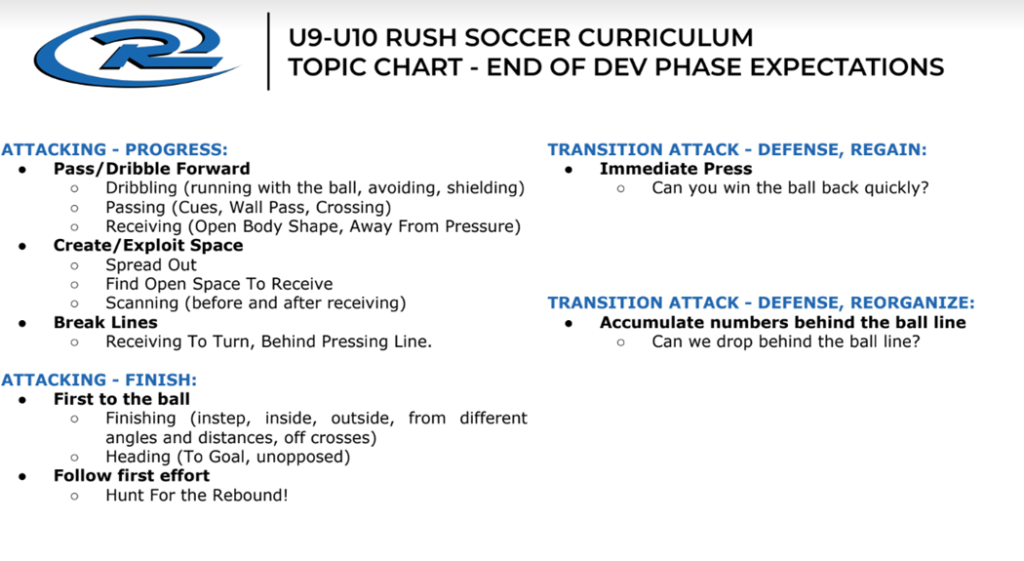
Based on this initial assessment, I realized that both my teams were at the U9-U10 curriculum topics, and this is simple yet very important to stress: Just because you have a U11 team (or U12 or U13 or whatever age group) it doesn’t mean that’s the curriculum you should be teaching.
To define this was very important for planning and also for communication, because when I organized the first parents meeting, I explained to the parents that the objective is not to teach it all but to build learning blocks, and that along the year we would only be working on these particular topics.
Now that we had that flag on the ground telling us where to start, I was pretty tempted to use Rush Coaching Manual and define two automatic season plans for the teams and just follow them (my club is RSD+ so we have this awesome feature available), but I thought it would be too premature for that. Why? Because the progressions that we are showing you on our curriculum are a starting point. It is really on you to adjust these bases to the needs of your players using some important educational concepts. Let me explain that in further detail.
When you look at these plans, you’ll notice that topics are always alternated. Is that bad? Not at all, that’s a good thing, but there are also other ways or other tweaks that you can apply.
In the case of my teams, because so many of the topics were going to be new to the players, I decided to start the season organizing blocks of training in which new topics were going to be almost repeated to build an initial foundation of knowledge, and then once that’s settled (even if still very imperfect in its execution) we’d start alternating them, or in better words, spacing them out more in time.
The idea behind this is simple. Think about it like this: If this was the first time ever that you are learning to multiply, you could use a couple classes in a row to set the bases of it, right? Then, once you get those bases, even if you’re not the best at it, we can continue to practice multiplication but without necessarily doing it every single day. It would be really unlikely to learn to multiply if you have one class and then there’s a six month gap in which you don’t review the topic again. Well then, we are following the same idea here. What I envision is that we’ll use the season planner from the Rush Coaching Manual with fully alternated topics in the second part of the season, once we’ve managed to build some foundations (but we’ll see where we are as we go).
All of this said, this came out as our first training plan for both teams, only for two weeks and in which our priority is to teach foundational concepts of:
- Rules of the game:
- Throw in
- Goalkicks
- Kick offs
- Basic Defensive Concepts:
- Put pressure on the ball (body stance, don’t dive in, lead to a side, keep eyes on the ball).
- Block the shot when the opponent is on our box or nearby (step to the ball instead of retreating towards our goal)
- Dribbling / Running with the ball using the Instep
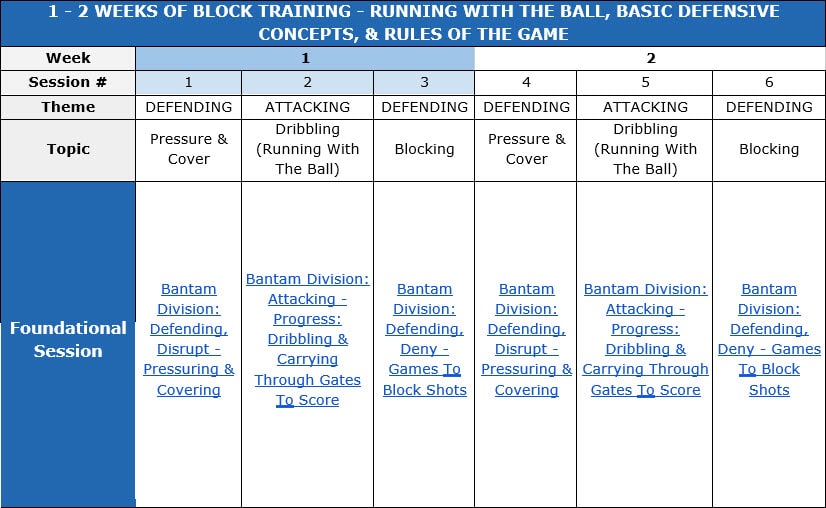
As you can see in our plan, we used ⅔’s of the sessions for defensive concepts and we tried to ‘build a story’ from them, just alternating topics with some sessions for basic dribbling / running with the ball skills. What story? This one:
‘When we don’t have the ball, we want to defend, which means trying to protect our goal. How do we do that? Putting pressure on the ball, which means to step up to the opponent that has it, and trying to lead them away from our goal, whether it is to the sideline or back on the field, and the closer they are to our goal, the more important it is to quickly step up to the ball and try to block that shot. Why? Because the closer we are to our goal the more likely it is they’ll score if they shoot’.
That’s it. Two weeks to try to set that base, and that’s fine. Now the question that I get a lot is if I run the sessions as shown. Truth is 90% of the time I don’t. In fact, you can see in the plan that we repeated the same week (three sessions) twice but on the field, we were making small tweaks to them. I’m always tweaking them based on what I see or to support the story that I’m trying to tell. That’s how I see training overall (and this is just an opinion), especially when people ask me about session structures, which I consider quite irrelevant in many cases (not in all). I think your session should be built about your narrative, on your teaching approach. The question is: What are you trying to teach? And how are you going to try to teach it? Based on those two answers I’d build my session, so for example, when I was trying to teach ‘blocking the shot in shooting range’, my approach was to start by having the players recognize dangerous spaces. In other words, I was planning for their mistake, I wanted to see shots not blocked in spaces where we should block, to make a stoppage to ask the players which they think the most dangerous places are. Once those spaces were recognized, my planned progression was to focus on the attitude of trying to block the shot by stepping to the ball, and hopefully if that went well, move forward onto a third step in which we’d focus on the specifics (the body stance, angle, etc) of how to try to block that shot.
Based on that plan or narrative for teaching the topic, I built a session, so in the second activity of the session I took as a base, I modified the setup extending the lines of the box to what I consider a ‘shooting range’, trying to create a visual reference of it. Why? Because when I ran the activity and the opponent started shooting from there, I made my stoppage and used this extended box to help the players recognize dangerous spaces. Once they understood that, I started coaching on the flow simply stating two questions:
- Where’s the ball now?
- What do we need to do?

To stress it even more, it reached a point in which for two minutes I asked the goalkeeper to step outside of the field and I had the defenders playing without one, also conditioning the attacking team to “you can only shoot inside the red box”, so as to create a sense of urgency for the defense to block the shot in that area. Truth be told is that from my plan, I never made it to the third step in which I was going to teach the specifics of how to block that shot. We spent the session just trying to get the attitude of blocking the shot there and recognizing dangerous spaces, and that was fine. We’ll take them there step by step, little by little.
Ok, this is already a lot for this first part. In Part II I’ll tell you what we did after these two weeks, what our assessment was, and what we planned for the following weeks as a result.
Hopefully you found this useful coach!


